Seam Tape Failure vs DWR Failure: Which Is Causing Your Leak
As an Amazon Associate we earn from qualifying purchases. Some links on this page are affiliate links, which means we may earn a small commission if you make a purchase.
Seam tape failure produces a drip at a stitch line; DWR failure produces a damp patch across the face fabric. That distinction matters because each requires a completely different repair approach, and using the wrong fix wastes both time and money.
Most people assume a leaking jacket means a dead membrane and reach for a new shell. More often than not, it’s neither dead nor a new-jacket problem. It’s one of two things: the seam tape has failed, or the DWR coating on the face fabric has given up. They look similar from the outside, but they have completely different causes and, critically, they need completely different fixes. Use the wrong one and you’ll spend money on a product that can’t solve your problem.
That’s what this article is for. By the end you’ll know exactly how to tell which type of failure you have, what fix actually works for each, and whether your jacket is worth saving at all.
Understanding the waterproofing system
A waterproof breathable shell isn’t one thing; it’s two separate systems stacked on top of each other, and they fail in completely different ways.
The face fabric is the outer layer you can touch and see. It’s treated with a DWR—a Durable Water Repellent coating—which is what makes water bead up and roll off when the jacket is working properly. DWR is a surface treatment, not a membrane. It’s bonded to the outside of the fabric, and it’s what makes rain “dance” off the surface. When DWR fails, water stops beading and starts soaking into the face fabric instead. The jacket looks wet and feels wet, but the membrane underneath might still be completely fine.
The seam tape is the inner waterproof seal—a strip of polyurethane or acrylic film heat-bonded over the stitch holes where the jacket is sewn together. Every stitch hole is a potential leak. The tape covers those holes. When seam tape fails, water finds its way through the stitching and into the jacket—often in a straight line along a seam, or in a patch that matches exactly where a seam sits on the inside.
Think of DWR as the outer shell of a tent; it’s the first defence and it’s exposed to everything. Seam tape is like the tape on a sealed bag of flour. The bag itself is fine, but if the tape peels, flour gets wet. You can re-tape the bag without changing the flour, but you can’t fix a peeling tape by coating the outside of the bag.
Why they fail differently matters. DWR degrades from contamination—body oils, dirt, ordinary detergent residue, the grime of a season’s walking—and from abrasion over time. It doesn’t fail from age alone, and it doesn’t fail suddenly. Seam tape degrades from adhesive breakdown: heat cycles over years, flexing at high-movement points like the shoulders, and plain old age. The tape can look fine for years and then start lifting without warning. Seam tape on Gore-Tex and similar membrane jackets typically lasts five to eight years with regular use, though high-stress areas (shoulders, neck) can fail earlier. DWR, by contrast, can fail in a single season of heavy use if the jacket is frequently worn in dirty or muddy conditions. They’re on different timescales, which is why an older jacket with failed DWR may still have perfectly good seam tape—and vice versa.
So when you feel a wet patch on your shoulder seam, your first question isn’t “is the jacket dead?” It’s “which layer has failed?” Because the answer tells you exactly what to do next.
How to diagnose the problem
This is the test that tells you which failure you have, and it takes about five minutes on a dry day at home.
The Wetting Pattern Test
Look at where the jacket is wet. This is the most important diagnostic clue you have.
If water is entering in straight lines or localised patches that match the position of seams—particularly shoulders, neck, armholes, or the centre front zip—that’s seam tape failure. The water is coming through stitch holes where the tape has degraded. You get a distinct, targeted wet area, not a general dampness across the whole jacket.
If the entire face fabric is soaking through evenly—the whole front goes dark when it rains, not just a seam line—that’s DWR failure. The membrane is holding, but water is soaking into the outer fabric faster than it can bead off, and that saturated fabric lets water pass through to the inside by osmosis and evaporative cooling. It feels like leaking. Mechanically, it’s not; the membrane is still working, but the face fabric has stopped shedding water.
The pattern matters. A straight line of water following a seam is seam tape. A jacket that looks uniformly soaked is DWR.
The Visual Inspection
Before you do anything else, have a proper look inside the jacket in good light. Turn it inside out and check the seam tape, particularly at the shoulders and around the neck, which take the most flex stress.
What you’re looking for: tape that is lifting at the edges, bubbling, flaking, or visibly degraded. If the polyurethane film is sticky, crumbly, or peeling away from the seam, that’s seam tape failure. If the tape looks intact and the problem is across the whole front face of the jacket, it’s DWR.
For DWR, a simple test: hold a cup of water and flick it at the face fabric. If the water soaks in immediately and the fabric goes dark, the DWR is dead. If it beads up and rolls off, the DWR is still working and your leak is somewhere else.
The Don’t Guess Rule
The mistake most people make is spraying a DWR restorer onto a jacket with seam tape failure. It won’t work, because DWR restorer only treats the face fabric surface. It cannot seal stitch holes. So if the water is coming through a seam, a spray-on coating won’t touch it. You’re wasting the product and leaving the real problem unfixed. Equally, applying seam sealer to a jacket that has DWR failure—but intact seam tape—won’t fix the wet-out either. You’d be sealing seams that aren’t the source of the problem.
Getting the diagnosis right first saves you money. It also tells you exactly what product you actually need.
Now you know what to look for—get the Free Waterproof Care Checklist to run through the full diagnostic sequence at home.
Seam tape repairs
If your diagnostic points to seam tape failure, the fix is a seam sealer—a polyurethane-based product that physically seals the stitch holes and re-bonds to the compromised tape. Many repairers use Gear Aid Seam Grip WP (paid link) for this type of job.
Check Gear Aid Seam Grip WP price → (paid link)
The mechanism is straightforward: seam sealer is a liquid polyurethane that you apply directly over the damaged tape. It fills the stitch holes, bonds to the existing tape, and cures to a flexible, waterproof film. It does what the factory tape was doing—seals the holes—but it does it from the inside, after the original adhesive has given up.
This works when the seam tape is still partially attached and the fabric around it is structurally sound. If the seam tape is completely peeled away and the jacket is old, or if the membrane itself is torn, a seam sealer won’t fix it. You’re into replacement territory at that point.
The honest drawback: seam sealers are messy. Gear Aid Seam Grip WP (paid link) in particular is a thin polyurethane that wants to go everywhere except where you put it. You’ll want to tape off surrounding fabric with masking tape, work in a ventilated space, and apply it carefully with a small brush or the applicator cap. The smell is strong—solvent-based—so outdoors or in a garage is better than a kitchen.
Cure time is the other thing worth knowing: most seam sealers need 12–24 hours to fully cure. Don’t touch the repaired seam during this window, and don’t pack the jacket away until you’re sure it’s set. The sealer can crumble or flake after a couple of years; it doesn’t last forever, and reapplication is part of ongoing maintenance for an older jacket. But it’s a fraction of the cost of replacement, and it works.
If the tape is lifting significantly across a long seam and the jacket is more than about eight years old, it’s worth weighing repair cost against replacement. Seam sealer is excellent for targeted, localised failures. It’s not a permanent solution for a jacket whose seam tape has comprehensively given up.
DWR restoration
If the diagnostic points to DWR failure—the whole face fabric is wetting out, not just a seam line—the fix is a DWR restorer. These are coatings that re-apply hydrophobic treatment to the fabric surface so water beads up again. Nikwax TX.Direct (paid link) and Granger’s Clothing Repel (paid link) are the two most widely available options in the UK.
Check Nikwax TX.Direct price → (paid link)
Here’s the step most people skip: you must wash the jacket first.
DWR fails because the face fabric is contaminated by grime, body oils, or detergent residues. If you apply a new DWR coating over that contamination, the new coating bonds to the dirt, not the fabric. It’ll fail again within weeks. Tech wash (Nikwax Tech Wash (paid link) or Granger’s Performance Wash (paid link)) removes that contamination cleanly without leaving residues that interfere with the new coating. This is the preparation step that most DIY reproofing tutorials skip, and it’s why so many people report that their reproofer “didn’t work.” Washing removes the contamination that causes DWR failure, and it can restore some beading on its own through the heat of a tumble dry. But washing will not fix seam tape failure. Seam tape fails because the adhesive has degraded—detergent doesn’t fix that. You need a seam sealer for structural seam leaks.
Check Granger’s Performance Wash price → (paid link)
Check Nikwax Tech Wash price → (paid link)
Wash the jacket on a 30°C cycle with a tech wash, then either tumble dry on a warm setting or apply heat with an iron on low—the heat reactivates the remaining DWR and helps the new coating bond properly. Gore’s own care guidance emphasises this wash-then-heat sequence before adding any new DWR treatment.
Once the jacket is clean and dry, apply the DWR restorer. Wash-in products (TX.Direct, Granger’s Clothing Repel (paid link)) go in the machine with the jacket on a second cycle. Spray-on versions allow more targeted application on high-wear areas like the shoulders and hood. Either way, the jacket needs another tumble dry to cure the new coating.
Check Granger’s Clothing Repel price → (paid link)
The honest caveat with DWR restorers: they restore surface beading, not a dead membrane. If the membrane itself has failed—genuinely torn or delaminated—no amount of DWR coating will fix it. But in most cases where a jacket is wetting out evenly across the face fabric, DWR failure is the cause, not a torn membrane. A proper wash-then-reproof cycle is usually enough to bring a structurally sound jacket back to working condition.
The one warning worth knowing: some spray-on DWR coatings can affect the adhesive that holds seam tape in place. This isn’t universal, and it’s more of a risk with older jackets where the tape adhesive is already marginal, but it’s worth knowing before you apply a spray-on to a jacket with suspect seams. A wash-in reproofer is generally the safer choice for full-jacket application.
Repair or replace?
Both fixes above assume the jacket is worth saving. Here’s how to make that call.
For seam tape: if the tape is lifting across short sections and the rest of the jacket looks sound, a seam sealer repair is worth doing. If the tape is comprehensively peeling, if the membrane shows any signs of delamination (bubbling or separating from the face fabric), or if the jacket is more than about eight to ten years old, replacement is the better call. The repair cost is real and recurring; at some point the maths changes.
For DWR: if the face fabric is intact, the seams are sound, and the membrane feels uniformly waterproof when you press your hand against it from the inside (you should feel resistance; if it feels thin or papery, the membrane may be degrading), then reproofing is almost always the cost-effective move. A bottle of tech wash and a matching DWR reproofer costs roughly £15–£25 in total. A replacement Gore-Tex shell is a few hundred pounds.
The decision tree is simple: if both the DWR and the seam tape are failing, fix the seam tape first, then reproof. If the jacket is old enough that both have given up simultaneously, or if the membrane itself feels compromised, start looking at replacement.
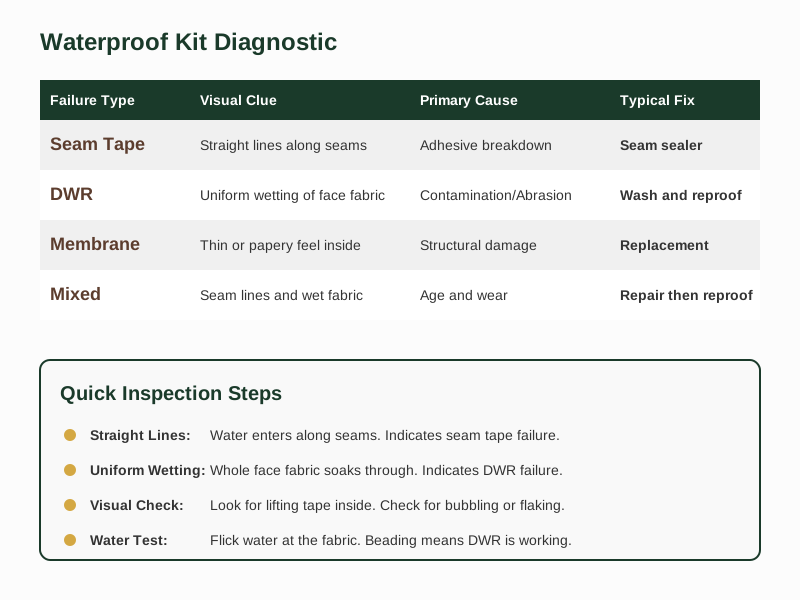
Waterproofing Failure Comparison
| Failure Type | Visual Clue | Primary Cause | Typical Fix |
|---|---|---|---|
| Seam Tape | Straight lines along seams | Adhesive breakdown | Seam sealer |
| DWR | Uniform wetting of face fabric | Contamination & abrasion | Wash & reproof |
| Membrane | Thin or papery feel inside | Structural damage | Replacement |
| Mixed | Both seam lines and wet fabric | Age and wear | Repair then reproof |
Simultaneous failure and diagnostic resources
When both seam tape and DWR fail together—common in jackets over eight years old—the correct repair sequence is seam tape first, then reproof. Fix the structural leak before addressing the surface treatment. The Free Waterproof Care Checklist provides the complete diagnostic reference for identifying which failure you’re dealing with, while the disclaimer below covers the limitations of general guidance.
If you’ve worked through the diagnostic and confirmed you have seam tape failure, Gear Aid Seam Grip WP is a commonly used product for the repair. If DWR failure is your diagnosis, Nikwax Tech Wash (paid link) followed by Nikwax TX.Direct (paid link) (or Granger’s Clothing Repel (paid link)) is the sequence that the care chemistry supports.
Related guides
For more on wetting out symptoms, see our Why Waterproof Jackets Wet Out (and What to Do Instead of Buying a New One) .
Sources & further reading
As an Amazon Associate we earn from qualifying purchases.
General guidance only. Always verify specific care instructions with the manufacturer of your garment.