Groundsheet vs Flysheet: What to Proof and What Not To
As an Amazon Associate we earn from qualifying purchases. This page contains affiliate links — if you buy through them, we earn a small commission at no extra cost to you.
The hydrostatic head rating of a typical tent flysheet sits around 1,500–3,000 mm, while groundsheets typically run to 6,000–10,000 mm or higher. That difference explains why spraying reproofing liquid onto a groundsheet achieves almost nothing: the waterproofing challenge comes from below, not above. A spray-on DWR product is designed for water landing on a surface, not water being forced through fabric by pressure from the ground.
You wake at 3 a.m. to a damp sleeping bag. The roof is fine — no drips from above — but there’s a cold patch under your hip, spreading slowly across the groundsheet. You know the flysheet needs attention, so you grab the reproof spray and work your way around the outer skin. But the damp patch is still there in the morning.
The honest answer is that you probably sprayed the wrong part of the tent.
Groundsheet versus flysheet waterproofing isn’t a debate about which product is best — it’s a distinction that hinges on a single physical fact about how water moves. Get this wrong and you’re spraying a coating onto a surface where it simply cannot work. Get it right and the fix is usually cheaper, simpler, and more effective than another bottle of proofing spray.
Understanding Your Flysheet’s Needs
The flysheet is your tent’s first line of defence against rain, and it is built differently from the floor. Many modern flysheets use silicone-coated ripstop nylon with a Durable Water Repellent (DWR) finish on the outer face. The silicone sits on both sides of the fabric, creating a hydrophobic barrier, while the DWR layer on the outside forces water to bead and roll off rather than soaking into the face.
That outer DWR is what degrades first. Dirt, UV exposure, and the oils from your hands all break down the chemistry, and once it goes, the fabric starts to “wet out” — it looks dark and damp even though the membrane underneath is still intact. This is the same mechanism you see on a waterproof jacket. Forum threads on UK outdoor communities regularly confuse wetting-out with a failed membrane, but they are different problems: the jacket or flysheet is still waterproof; it just needs the surface chemistry restored. Washing off the grime first, then reproofing with a wash-in or spray-on product, brings the beading back and keeps the fabric doing its job.
The flysheet reproofing question — wash-in or spray-on — is one where owners genuinely split. Some prefer spray-on proofers because wash-in products carry a reputation for leaving residue that can affect breathability, which is a fair concern if you’re using a membrane. Nikwax advises applying proofing while the item is still wet from washing, and to only tumble dry on low if the care label permits. Granger’s directs users to a 30°C wash cycle followed by the proofer. For a tent flysheet specifically, a wash-in proofer is practical because you can treat the whole sheet in a large machine or a bathtub; the spray-on is more fiddly but useful for touch-ups on a worn hood or rain-shadow section. Both work — the honest answer depends on what you’re most likely to actually do, which matters more than the method itself.
Why Groundsheet Reproofing Usually Fails
Now for the bit that saves you money. The groundsheet is not the flysheet. It is built as a bathtub — a heavy, thickly coated floor that sits directly against the ground and relies on factory-applied silicone on the inside face (the side facing up into the tent) to stop water rising through the fabric. Groundsheets typically run to 10,000mm hydrostatic head or higher, which is several times the rating of a flysheet. That rating exists because water from below — groundwater, a wet field, condensation pooling under the flysheet — pushes upward against the fabric, and the coating must resist that pressure.
Here is the physical reason why spraying DWR onto your groundsheet does nothing useful. DWR works by making the outer face of a fabric hydrophobic. Water beads on the surface rather than soaking in. But on a groundsheet, the side facing the ground is the outer face in terms of the waterproofing challenge. Water pressure from below pushes through the fabric before it ever reaches the underside. Spraying proofer onto the underside — which is what people do when they “proof the floor” — treats the wrong surface entirely. The DWR would need to sit on the ground side to interact with incoming water, and it still wouldn’t work because the mechanism is designed for water landing on a surface from above, not water being forced through by pressure from below. It’s like putting a weatherproof coat on the inside of your umbrella.
This is where the real failure point lives: seam failure. Groundsheet seams are sealed at the factory with taped overlays. Over time, that tape can lift, especially at the corners where abrasion is highest. Pinholes from a stray tent peg or a stone pressed under the fabric will also let water through. None of these problems are fixed by a coating on the wrong side of the fabric. Forum discussions about “re-proofing the groundsheet” frequently report noticing “some improvement” after treatment, but this is almost always because cleaning the floor also cleaned the seams — which may have been partially blocked by mud — and the seam tape, now visible, was doing its job again. The proofer itself had nothing to do with it.
There is also a practical hazard: applying a DWR coating to the inside of your groundsheet can make it slippery. If you’ve ever had a sleeping mat slide across the tent floor during the night, adding a low-friction coating on top of that is moving in the wrong direction.
The fix for a wet groundsheet isn’t spray-on chemistry. It’s seam sealer applied to the outside of the seams, or a patch repair for a puncture. A footprint — a separate groundsheet that sits under your tent — is the right way to protect the original floor from abrasion. The groundsheet’s waterproofing comes from the coating and the taped seams, both of which are factory-applied and not replaceable by a bottle.
For the majority of readers dealing with a damp sleeping bag: reproof the flysheet after washing it. Inspect the groundsheet seams and seal them if needed. Don’t spray the floor.
Fixing a Damp Groundsheet Properly
If water is getting through the floor, start by cleaning the groundsheet thoroughly — mud and organic matter hold moisture and can mask seam issues. Use a dedicated tech wash and let the fabric dry completely. You’re looking for the seams at this point.
Run your fingers along the taped seams, particularly around the corners and along the main floor perimeter. Look for lifting tape, any pinhole punctures, or areas where the coating looks worn through. A small leak at a seam — particularly on the outside face where water is actually pushing — responds well to a seam sealer applied from outside the tent. Gear Aid Seam Grip WP (paid link) is a reliable option for sealing seams on coated fabrics, and once cured it holds up well against repeated ground contact. The gripes are the smell, the mess during application, and the cure time — plan to apply it in good weather and allow it to set overnight. It’s not a quick fix, but it is the correct one.
Buy Gear Aid Seam Grip WP on Amazon → (paid link)
For a larger tear or a seam that’s completely failed, a patch kit is the answer. This means cleaning the area, applying the patch from outside, and letting it cure properly. Most tent manufacturers sell compatible footprint and patch kits for their own models, which is worth knowing if you’re trying to match the fabric weight and coating.
A footprint is the long-term protection that stops you needing to do this again. It sits between the ground and the tent floor, taking the abrasion that would otherwise wear through the factory coating over a few seasons. Some brands like Terra Nova and Wild Country sell dedicated footprint products designed for their tent ranges. For a new tent, the cost of a footprint can be a worthwhile investment to protect the original groundsheet.
Quick Checklist: Proofing Dos and Don’ts
- Do wash the flysheet before you reproof it. Dirt blocks the DWR from bonding to the fabric — you’re sealing in the grime if you spray over a dirty surface.
- Do reproof the flysheet with a wash-in or spray-on DWR product after cleaning. Both methods work; choose whichever you’re more likely to complete.
- Do inspect the groundsheet seams if the floor is wet. The problem is almost always at a seam or a puncture, not in the fabric coating.
- Do use seam sealer on the outside of the groundsheet seams — that’s where the water is actually pushing through.
- Don’t spray or wash the underside of the groundsheet with DWR proofer. It won’t work, and it can make the floor slippery.
- Don’t ignore a wet floor. Damp over multiple trips leads to mould, degrades the sleeping bag insulation, and will get worse.
Now you know what to look for — Get the Free Waterproof Care Checklist to keep these steps to hand when you’re back at the tent after a wet weekend.
Common Questions Answered
Can I use Nikwax Tent & Gear SolarProof on the groundsheet?
No. Nikwax Tent & Gear SolarProof is a DWR product — it restores the outer-face water repellency of a fabric. On a groundsheet, the water is coming from below, not landing on the surface, so the mechanism simply doesn’t apply. What you need for a wet floor is a seam check and a seam sealer applied to the outside of the taped seams.
Why is my tent floor wet in the morning but dry outside?
This is worth checking carefully. If the ground is wet outside but the floor is damp only in a specific area, it’s almost always a seam leak or a puncture. Condensation inside the tent typically settles on the cold flysheet first and drips — you’d see it on the roof, not pooled on the floor. If the damp patch is under your sleeping mat, that’s pressure pushing water through a weak point in the floor, which points to a seam or a hole, not a coating problem.
Should I buy a footprint or reproof my groundsheet?
A footprint. The groundsheet’s waterproofing comes from factory-applied silicone and taped seams — neither of which you can restore with a bottle of spray. A footprint protects the original floor from abrasion, keeps the underside cleaner, and is the correct solution for wear and tear. Reproofing the groundsheet is the wrong product applied to the wrong surface.
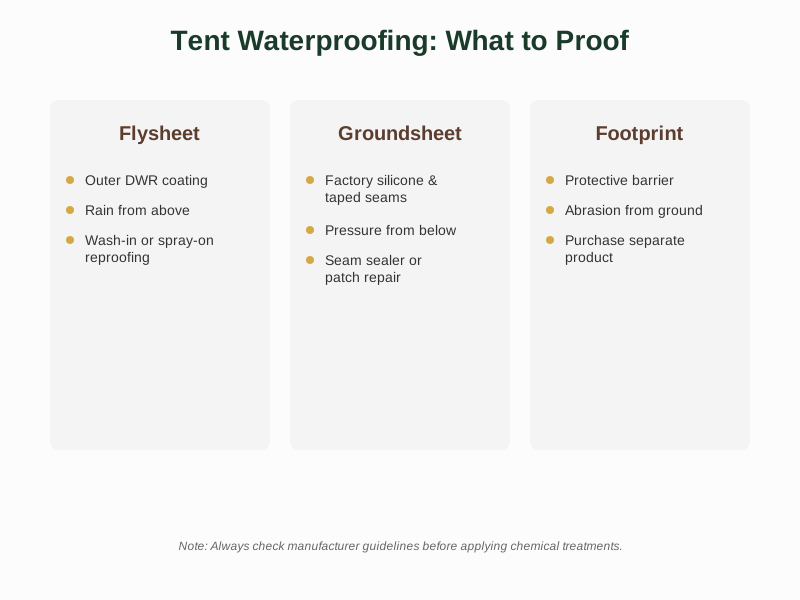
The primary defence of a flysheet is its outer DWR coating, designed for rain from above and repaired with wash-in or spray-on reproofing. A groundsheet relies on factory silicone and taped seams to resist groundwater and pressure from below, and is fixed with seam sealer or a patch repair. A footprint is a separate protective barrier against abrasion from the ground.
Final Thoughts on Tent Care
The distinction between flysheet and groundsheet is one of those details that sounds obvious once you understand it — but the reason it matters is the physics, not just the terminology. Flysheets wet out because the outer DWR degrades, and reproofing restores it. Groundsheet leaks are seam failures or punctures, and no surface coating applied to the wrong side of the fabric fixes that.
Spray the flysheet. Seal the seams. Get a footprint before the floor wears through. That’s a dry night without spending money on a product that can’t do what you need it to.
Cleaning off abrasive grit before storage extends groundsheet life more than any reproofer can. Get the Free Waterproof Care Checklist — it covers tents, waterproof jackets, and overtrousers in one place, so you’re not guessing which step comes next.
Related Guides
Note: General guidance only, verify details with a qualified professional or official source.
As an Amazon Associate we earn from qualifying purchases.